Create Decentralized Identifiers And Verifiable Credentials With Veramo Framework


Decentralized Identifiers (DIDs) and Verifiable Credentials have gained significant momentum in recent times due to their potential to revolutionize the way we manage and share our personal information online. 

In this article, know how to create DIDs and Verifiable Credentials using the Veramo Framework.  

What Is Veramo Framework?

Veramo is an open-source JavaScript framework that provides a simple and easy-to-use SDK for creating and managing DIDs and Verifiable Credentials. It is built on top of the Interledger Protocol (ILP) and supports various blockchain platforms, including Ethereum, Bitcoin, and more. 

Veramo, collaborate with the W3C and the DIF to ensure compatibility with a multitude of projects and initiatives in the decentralized identity space. Veramo provides flexibility in designing your agent by offering core plugins for various components such as DID Methods, Messaging Protocols, Storage, Key Management, Authentication, and more.

With Veramo, developers can easily implement DIDs and Verifiable Credentials in their applications, enabling them to build more secure and privacy-respecting systems.

Veramo Key Concepts

Veramo is a decentralized identity framework that focuses on various key concepts that are:

1. Verifiable Data

Verifiable data refers to information that can be verified as true and accurate by a trusted party. Additionally, one can obtain this by using Verifiable Credentials, which are signed digital documents that prove claims about individuals.

A Verifiable Credential in Veramo is a digitally signed and encrypted piece of information that serves as proof of an identity attribute or a claim made about an individual. The signature and encryption are used to ensure the integrity and confidentiality of the information, and the fact that a trusted third party verifies the information provides a high level of trust in its accuracy and authenticity. 

Here is an example of a Verifiable Credential in Veramo using JSON-LD format. In this example, the verifiable credential attests bachelor’s degree for a subject using a DID of did:example:ebfeb1f712ebc6f1c276e12ec21. The proof is signed by the issuer using the EcdsaSecp256k1Signature2019 signature type. 

{ 

    "@context": [ 

        "https://www.w3.org/2018/credentials/v1", 

        "https://www.w3.org/2018/credentials/examples/v1" 

    ], 

    "id": "https://example.com/credentials/3732", 

    "type": [ 

        "VerifiableCredential", 

        "UniversityDegreeCredential" 

    ], 

    "issuer": "did:example:ebfeb1f712ebc6f1c276e12ec21", 

    "issuanceDate": "2010-01-01T19:23:24Z", 

    "credentialSubject": { 

        "id": "did:example:ebfeb1f712ebc6f1c276e12ec21", 

        "degree": { 

            "type": "BachelorDegree", 

            "name": "Bachelor of Science and Arts" 

        } 

    }, 

    "proof": { 

        "type": "EcdsaSecp256k1Signature2019", 

        "created": "2022-07-01T19:23:24Z", 

        "proofPurpose": "assertionMethod", 

        "verificationMethod": "did:example:12q3vfrt8q9we8rqw0efrq0wqe", 

        "signatureValue": "base64(hF+...)" 

    } 

}

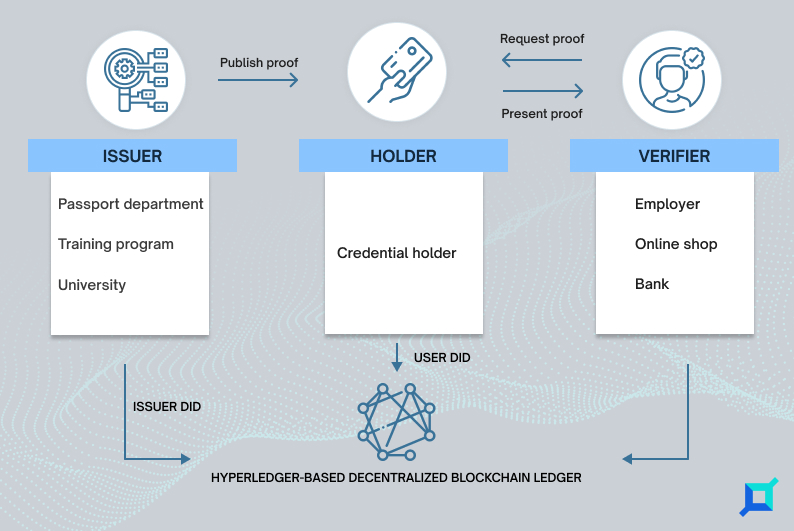
2. Decentralized Identifier

A Decentralized Identifier (DID) is a unique identifier used to refer to a subject in a decentralized system, such as a blockchain or a distributed ledger. In the context of Veramo, a DID can be used to identify a subject of a verifiable credential, such as an individual, an organization, or a device.

DIDs are designed to be self-sovereign, meaning that the subject has control over its own identifier and can manage the associated data without needing a centralized authority. It provides a privacy-preserving and secure way to represent entities with verifiable credentials. Moreover, the DID can be used to ensure that the right data is being shared with the right recipient.

In Veramo, a DID is like a string that starts with the prefix did:, followed by the identifier of the decentralized system where the DID is registered.

Currently, Veramo core supported methods are ether, web, and key. 

For example, a DID could look like this: did:ether:ebfeb1f712ebc6f1c276e12ec21. 

3. Signing & Key Management

Veramo provides tools and plugins for signing and managing keys associated with DIDs. This includes key management plugins for creating, storing, and retrieving private keys, as well as signing plugins for signing Verifiable Credentials. 

4. Plugins

Veramo provides a range of core plugins for DID Methods, Messaging Protocols, Storage, Key Management, Authentication, and more. Developers can use these plugins to design their agents as they see fit. 

You can find a complete list of Vermao plugins here. 

5. Agents

An agent is a piece of software that acts on behalf of an individual in the decentralized identity ecosystem. Veramo provides tools and plugins to build agents that can create and manage DIDs and Verifiable Credentials.

Veramo DID Agent

The Veramo Agent is responsible for performing various tasks, such as:

  • Creating identifiers
  • Resolving identifiers
  • Issuing credentials
  • Revoking credentials
  • Exchanging credentials

Additionally, the Veramo Agent acts as a central hub, providing a common interface for developers to expand its functionality by using plugins. When instantiated, the Veramo Agent manages both core and custom plugins and orchestrates the core event system.  

6. Selective Disclosure Request (SDR)

A Selective Disclosure Request is a feature in the Veramo framework that allows an individual or organization to selectively disclose specific pieces of information from their digital identity. It allows them to control the amount of personal information they share with other parties while maintaining privacy. The Veramo framework uses cryptographic techniques to securely store and share this information, ensuring that only authorized parties can access it.

Steps To Create A DID & Verifiable Credential Using Veramo CLI

Following the below-mentioned steps, you can form a DID and Verifiable Credential using Veramo CLI.

#1 Step: Install Veramo CLI

The first step is to install the Veramo CLI by running the following command in your terminal:

npm i @veramo/cli -g

#2 Step: Create Configuration File

You can create a configuration file in the current folder by running the following: 

veramo config create 

#3 Step: Create A DID

To create a DID, run the following command:

veramo did create 

This command will create a DID and store the keys in a local database.

#4 Step: Resolve A DID

To resolve a DID, use the following command with the identifier of the DID you want to resolve, such as

did:ethr:0xf3abebb0d4f5d7e08c2557772f9ce8692a795ab8. 

veramo did resolve your_did_identifier 

#5 Step: Create A Verifiable Credential

To create a Verifiable Credential, run the following command:

veramo credential create 

Conclusion

In this article, one can learn how to create DIDs and Verifiable Credentials using the Veramo Framework using CLI. The Veramo Framework provides a simple and easy-to-use API for creating and managing DIDs and Verifiable Credentials, making it an excellent choice for developers who are new to the space.  

The Veramo framework can be implemented in projects using CLI or SDKs in various languages, including NodeJS, ReactJS, and React Native; you can choose the option that best suits your project requirements. 

If you are planning to develop such projects, connect with Infrablok. Our technicians are proficient in Node.js, React.js, and React Native and can assist in developing a DID project using the Veramo framework.      

Exploring The World Of Hyperledger Indy By Building A DID Solution


Hyperledger Indy is an open-source framework based on distributed ledger technology for providing self-sovereign identity. It is one of the Hyperledger projects hosted by The Linux Foundation. 

Indy provides a framework for creating and managing digital identities that are verifiable, private, and portable. Allowing individuals and organizations to create, manage, and store their own digital identities and provide tools for verifying the authenticity of these identities. 

It is designed to be a foundation for developing various identity-related applications, such as digital identity verification, secure sharing of personal information, and digital signing. It is also suitable for use cases such as providing secure access to online services, creating digital identities for IoT devices, and enabling secure communication between organizations. 

Indy is built using a modular architecture, which allows developers to add new features and functionality and customize the platform to meet their specific needs. 

In summary, Hyperledger Indy offers a distributed ledger technology that allows individuals and organizations to create, manage, and store their own digital identities securely and independently. Its flexible and modular architecture allows developers to add new features, customize them to their specific needs, and build various identity-related applications. 

Hyperledger Indy’s Key Features

Hyperledger Indy has several key features that make it well-suited for use cases related to digital identity management: 

1. Self-Sovereign Identity

Hyperledger Indy provides individuals and organizations with the ability to create, manage and control their own digital identities without the need for a centralized authority. 

2. Decentralized & Distributed

Indy uses a decentralized and distributed ledger technology, which ensures that digital identities are tamper-proof and transparently managed. 

3. Verifiable & Private 

Indy allows for the creation of digital identities that are verifiable, private, and portable. It uses digital signatures to verify the authenticity of identities and encrypts personal information to protect privacy. 

4. Interoperable 

It is designed to be interoperable with other identity systems and can be integrated with other technologies, such as biometrics and blockchain. 

5. Modular Architecture

Indy’s modular architecture allows developers to add new features and functionality to the platform and customize it to meet their specific needs. 

6. Scalable

It can handle a high volume of transactions and many digital identities, making it suitable for large-scale use cases such as providing digital identities for IoT devices. 

7. Compliance 

Hyperledger Indy’s design allows for compliance with various regulations and standards, such as GDPR, HIPAA, and others. 

8. Identity Verification

Indy provides a framework for creating and managing digital identities that are verifiable, private, and portable. It allows individuals and organizations to create, manage and store their own digital identities and provides tools for verifying the authenticity of these identities. 

9. Secure Access To Online Services

Hyperledger Indy enables secure access to online services with the use of digital identities. 

Hyperledger Indy Benefits

Here view a few crucial user-centric features of Hyper Hyperledger Indy:

Hyperledger Indy Key Benefits

The Hyperledger Indy Projects

It is composed of several projects that work together to provide a platform for self-sovereign identity management. These projects include: 

  1. Indy Node: The core component of Hyperledger Indy, responsible for maintaining the distributed ledger and providing a RESTful API for interacting with the ledger.
     
  2. Indy SDK: A software development kit that provides libraries and tools for building applications that interact with Hyperledger Indy.
  3. Indy CLI: A command-line interface for interacting with the Hyperledger Indy platform.
     
  4. Indy Plenum: A Byzantine Fault Tolerant (BFT) consensus algorithm for the Hyperledger Indy platform.

  5. Indy Agent: A software agent that can act on behalf of a digital identity and perform actions such as creating and managing digital credentials.
     
  6. Indy Wallet: A client-side library for managing digital identities and digital credentials in a secure and user-friendly way.
     
  7. Indy Credx: A library for creating and managing digital credentials that can be used to prove attributes of a digital identity.
     
  8. Indy Anoncreds: A library for creating and managing anonymous credentials that can be used to prove attributes of a digital identity without revealing the identity itself.
     
  9. Indy Ledger: A library for creating and managing a distributed ledger, which is the backbone of the Hyperledger Indy platform.
  10. Indy Config: A library for configuring and customizing the Hyperledger Indy platform for different use cases and deployment scenarios. 

Together, these projects provide the necessary tools and functionality for creating, managing, and verifying digital identities on a decentralized and distributed ledger, as well as building various identity-related applications. 

8 Simple Steps To Create DID Using Hyperledger Indy CLI

Here is a step-by-step guide to creating a Decentralized Identifier (DID) using the Hyperledger Indy CLI: 

Step 1

Instal a version of libindy that’s built, installed, and callable in the system path. For building and installing libindy follow the instruction here 

Step 2

Run the Indy pool on your system. To run an Indy pool, follow the instruction in a given document. 

Step 3

Start the CLI by running the command “indy-cli” in the terminal. 

Step 4

Create a new wallet by running the command “wallet create” and by providing a name and passphrase for the wallet while entering the command. 

wallet create   your_wallet_name  -key 

Create a new wallet

Here are the options available when creating a new wallet with the Hyperledger Indy CLI: 

name - Identifier of the wallet 

key - (leave empty for deferred input) Key or passphrase used for wallet key derivation. 

            Look at the key_derivation_method param for information about supported key derivation methods. 

key_derivation_method - (optional) Algorithm to use for wallet key derivation. One of: 

                                    argon2m - derive secured wallet key (used by default) 

                                    argon2i - derive secured wallet key (less secure but faster) 

                                    raw - raw wallet key provided (skip derivation) 

storage_type - (optional) Type of the wallet storage. 

storage_config - (optional) The list of key:value pairs defined by storage type. 

storage_credentials - (optional) The list of key:value pairs defined by storage type. 

Examples:

wallet create your_wallet_name  key

wallet create your_wallet_name key storage_type=default

wallet create your_wallet_name  key storage_type=default storage_config={"key1":"value1","key2":"value2"} 

Step 5

Open the wallet by running the command “wallet open” and by providing the wallet name and passphrase. 

wallet open your_wallet_name key 

Create a new DID

Step 6

Create a new DID (Decentralized Identifier) by running the command “did new” and providing a seed (a string of random characters) for the DID. The seed is used to generate the private key for the DID. 

didnew [did=<did-value>] [seed[=<seed-value>]] [method=<method-value>] [metadata=<metadata-value>] 

wallet open

Here are the options available when creating a new DID with the Hyperledger Indy CLI:

  • did – (optional) Known DID for new wallet instance 
  • seed – (oponal) (leave empty for deferred input) Seed for creating DID key-pair (UTF-8, base64 or hex) 
  • method – (optional) Method name to create fully qualified DID 
  • metadata – (otiptional) DID metadata 

Examples: 

did new did=VsKV7grR1BUE29mG2Fm2kX 

did new did=VsKV7grR1BUE29mG2Fm2kX method=indy 

did new did=VsKV7grR1BUE29mG2Fm2kX seed=00000000000000000000000000000My1 

did new seed=00000000000000000000000000000My1 metadata=did_metadata 

Step 7

Verify that the DID was created and stored by running the command “did list” which should show the newly created DID in the list of identities stored in the wallet. 

Verify DID

Step 8

Use the DID to sign and verify messages or to encrypt and decrypt data by using the corresponding commands. 

Hyperledger Indy Use Cases

Hyperledger Indy Use Cases

Wrapping Up

In conclusion, creating a Hyperledger Indy DID use the command-line interface (CLI) is a straightforward process that involves installing the Indy CLI, creating a new wallet, generating a new DID, and storing the DID in the wallet. By following the steps outlined in this blog post, developers can quickly and easily create a new digital identity using Hyperledger Indy. This is just the beginning of what Hyperledger Indy can do.   

The possibilities are endless as it can be integrated with other technologies (NodeJS, .NET, and Python) to create robust and secure decentralized applications. Hyperledger Indy is a powerful tool for building decentralized identity systems and is well-suited for a wide range of use cases, from enterprise and government applications to personal identity management; if you are planning to develop such projects, connect with Infrablok. It will help you get experts who can help you design apps from scratch. 

Short Guide To Decentralized Identity System


Decentralized Identity (DID) systems are a new approach to identity management that seeks to give individuals and organizations more control over their own digital identity. DID systems are based on the concept of self-sovereign identity, which means that the individual or organization is in charge of their own identity rather than relying on a centralized authority (such as a government or large corporation) to issue and manage their identity.         

Benefits Of A Decentralized Identity System

There are several key benefits of a Decentralized Identity System, some of which are:

Increased Control & Privacy: In a decentralized identity system, the individual or organization is in control of its own identity and can choose what information is shared and with whom. It can help to protect privacy and prevent identity theft.    

Interoperability: DID systems are designed to be interoperable, meaning that they can work with different decentralized platforms and technologies. This makes it easier for individuals and organizations to use their digital identities across various applications and services.   

Decentralization: DID systems are decentralized, meaning that any organization or person does not control them. It can help prevent censorship and ensure the system is more resilient and secure.  

Introducing decentralized identity systems to individuals and organizations can help offer increased control and privacy, interoperability, and decentralization. Moreover, it provides examples of how DID systems can be used in real-world scenarios, such as logging into websites or accessing medical records.

How Does A Decentralized Identity System Work?

Decentralized Identity System Working

A Decentralized Identity System includes the following main elements:  

Blockchain

A Decentralized Database shared among computers in the blockchain network records information in such a way that it makes it very difficult to change, hack, or cheat the system.   

Decentralized Identity Wallet

A DID is a digital wallet that manages DIDs and the private keys associated with them. It allows the owner of the DID to sign digital documents or transactions and access services or applications that require DID authentication.

To use a DID wallet, the owner of the DID will typically need to install a DID wallet application on their device. They can then use this application to create a new DID or import an existing one. Once the DID is brought into the wallet, the owner can sign transactions or access services that require DID authentication.    

In addition to storing a DID and its associated private key, a DID wallet can store other cryptographic keys or credentials. It can be useful for managing access to multiple services or applications that require DID authentication.   

Overall, DID wallets play a central role in the functioning of a DID system. They allow individuals and organizations to manage and use their DIDs to authenticate their identity online and provide a secure way to store and access the private key associated with a DID.  

Decentralized Identifiers

Decentralized Identifiers (DIDs) are new identifiers that allow individuals and corporations to take control of their online identities. They are decentralized, meaning that any single entity, such as a government or corporation, does not control them. In contrast, distributed ledgers like Blockchains can be used to verify identity securely and transparently.  

One of the key benefits of DIDs is that they allow individuals to have more control over their personal information and how it is used. For example, if you have a DID, you can choose which organizations or individuals can access your personal information and revoke access at any time. It can assist in reducing the risk of identity theft and protect your privacy.   

Overall, DIDs are a promising technology that has the prospect of revolutionizing the way we assume about and manage online identity.  

Decentralized Identifier (DID) Key Component  

There are several key components of a Decentralized Identifier (DID):  

  1. DID Document: It contains information about the DID, including the methods that can be used to authenticate the DID and the associated services.  
  2. DID Method: This is a set of rules that define how a DID can be used and how it is stored on a distributed ledger.  
  3. DID URI: It is a unique identifier that is associated with a DID and is used to look up the DID Document.   
  4. DID Controller: This entity controls the DID and has the authority to update the DID Document.  
  5. DID Subject: This is the entity with which the DID is associated, such as an individual or organization.   
  6. Service Endpoint: This URL can access a service associated with the DID, such as a messaging or a payment service.  

Overall, these components work together to create a decentralized system for managing identity that is secure and transparent and gives individuals and organizations more control over their personal information.    

Verifiable Credential (VC)

Digital, cryptographically secured versions of the paper and digital credentials that individuals can represent to organizations needing them for verification. These are the main parties in the VC system:     

  1. Holder: A user who receives a Verifiable Credential after creating a decentralized identifier with a digital wallet app.  
  2. Issuer: The association signs a Verifiable Credential with their private key and issues it to the holder.  
  3. Verifier: A party that checks the credentials and can read the issuer’s public DID on the blockchain to verify if the Verifiable Credential the holder shared was signed by the issuer’s DID. 

Know How Centralized Identity System Flow Works with DID & Verifiable Credential?

Here is an example of how a centralized Identity system flow Works with DID and Verifiable credentials:    

1. Issuance

A subject (e.g., an individual) requests a verifiable credential from an issuer (e.g., a government agency). The issuer verifies the claims made by the subject and issues the verifiable credential, a digital record containing the claims, and a digital signature from the issuer.  

2. Storage

The subject stores the verifiable credential in a decentralized identity wallet, a secure digital repository for storing and managing decentralized identifiers and verifiable credentials. The subject’s decentralized identifier, a self-owned identifier that is unique and cryptographically verifiable, is use to identify & authenticate the wallet of the subject. 

3. Presentation

The subject presents the verifiable credential to a verifier (e.g., a service provider) as proof of a specific claim (e.g., age, employment status). The verifier can verify the verifiable credential’s authenticity by checking the issuer’s digital signature and the subject’s decentralized identifier.  

4. Verification

If the verifier trusts the issuer and the subject’s decentralized identifier, it can accept the verifiable credential as evidence and grant the subject access to a service or other benefit. Additionally, if the verifier does not trust the issuer or the subject’s decentralized identifier, it can request additional evidence or information from the subject.      

DID Protocols and Frameworks

Several decentralized identity protocols have been developed to enable the creation and management of DIDs. Some of the most widely used DID protocols include:   

World Wide Web Consortium’s (W3C) DID Specification: This is the primary standard for DIDs, and it defines a common syntax and structure for DID records, as well as a set of standard methods that can be used to create, update, and deactivate DIDs.  

Hyperledger Indy: This is an open-source framework for building decentralized identity applications. It includes a set of modular components that one can use to create and manage DIDs on various blockchains. 

Hyperledger Indy is a permissioned blockchain, meaning only authorized participants can access the network. Moreover, it can provide better privacy protection for identity information than public blockchains, where data is visible to anyone.   

Veramo: It is a JavaScript (JS) framework that makes it easy for anyone to employ cryptographically verifiable data in their applications. Developers can use DIDs, verifiable credentials, and data-centric protocols to provide next-generation features to their users.  

Overall, DID protocols provide a set of rules and standards that are used to create, manage, and use DIDs in a decentralized manner. 

Wrapping Up

With decentralized identity technology, many problems caused by centralized and federated identity management systems can be solved, including certificate fraud, slow and expensive verification processes, and data breaches. 

Moreover, you can connect with a reliable Blockchain company like Infrablok to get tools and infrastructure for creating DIDs on the permissioned and permissionless blockchains using Veramo and Hyperledger Indy. 

Tutorial To Connect APIs From Ethereum Smart Contracts Using Chainlink Oracles


Since Blockchain ecosystems are decentralized, on-chain smart contracts cannot access off-chain data natively. However, Chainlink furnishes a platform for blockchain oracles, which are nodes on the network that serves as a bridge between on-chain & off-chain data. Oracles enable smart contracts to retrieve external data.   

Each oracle node can be configured to perform a vast range of chores relying on the adapters it supports. Some of these adapters include HTTP POST, HTTP GET, JSON Parse, Multiply, etc.  

In this blog, we will explain how one can call Aviationstack.com API from Ethereum smart contracts using Chainlink’s oracle. 

4 Steps To Call Aviationstack.com API From Ethereum Smart Contracts Using Chainlink’s Oracle

Using Chainlink’s Oracles, the latest data can be retrieved by using any REST API call from a smart contract in real-time. The four simple steps stated below will help you know how to call the REST endpoint provided by Aviation Data in Solidity to get real-time flight status, i.e., scheduled, delayed, landed, etc. 

Step 1: Add A Testnet To MetaMask Wallet 

We will use the goerli TestNet for this example.    

  • Open Metamask and then click on the Networks and choose Goerli test network.   
  • In the remix, select Injected provider Metamask to connect to goerli test network.   
  • Before starting development, add some test coins from the test faucet from here. 

Also, get Link tokens from Chainlink’s test faucet.

Chainlink’s test faucet

Step 2: Find The Oracle Address For Your Chain   

From https://docs.chain.link/any-api/testnet-oracles/ get the list of different test net addresses of oracles.  

We are using goerli test net oracle with the address
0xcc79157eb46f5624204f47ab42b3906caa40eab7  

with jobId —7d80a6386ef543a3abb52817f6707e3b 

Whenever we request something through the Chainlink oracle, we request that through Chainlink jobs. Simple jobs define when, how, why, etc., that need to be done via Chainlink nodes. This job id (7d80a6386ef543a3abb52817f6707e3b) describes to the oracle that we need to return the response in a String of other jobs. It returns a response in bool, int256, unit 256, etc. 

Step 3: Add The Code To Your Solidity Smart Contract 

Integrate the following code into your smart contract: 

//SPDX-License-Identifier: MIT 

pragma solidity ^0.8.7; 


import '@chainlink/contracts/src/v0.8/ChainlinkClient.sol'; 

import '@chainlink/contracts/src/v0.8/ConfirmedOwner.sol'; 


contract UseAviationApi is ChainlinkClient, ConfirmedOwner { 

using Chainlink for Chainlink.Request; 

string public flightStatus; 


bytes32 private jobId; 

uint256 private fee; 


event RequestFulfilled(bytes32 indexed requestId, string indexed data); 

/** 

* Goerli Testnet details: 

* Link Token: 0x326C977E6efc84E512bB9C30f76E30c160eD06FB 

* Oracle: 0xCC79157eb46F5624204f47AB42b3906cAA40eaB7 

* jobId: 7d80a6386ef543a3abb52817f6707e3b 

*/ 

constructor() ConfirmedOwner(msg.sender) { 

setChainlinkToken(0x326C977E6efc84E512bB9C30f76E30c160eD06FB); 

setChainlinkOracle(0xCC79157eb46F5624204f47AB42b3906cAA40eaB7); 

jobId = '7d80a6386ef543a3abb52817f6707e3b'; 

fee = (1 * LINK_DIVISIBILITY) / 10; // 0,1 * 10**18 (Varies by network and job) 

} 


/** 

* @notice Request variable bytes from the oracle 

*/ 

function requestFlightStatus() public { 

Chainlink.Request memory req = buildChainlinkRequest(jobId, address(this), this.fulfill.selector); 

req.add( 

'get', 

'http://api.aviationstack.com/v1/flights?access_key=a6656fabf7fbe4fde6e4061f5be7042a&flight_number=611&airline_name=Qantas&limit=1' //aviationstack url 

); 

req.add('path', 'data,0,flight_status'); // parse the json tree 

sendChainlinkRequest(req, fee);  

} 


/** 

* @notice Fulfillment function for variable bytes 

* @dev This is called by the oracle. recordChainlinkFulfillment must be used. 

*/ 

function fulfill(bytes32 requestId, string memory data) public recordChainlinkFulfillment(requestId) { 

emit RequestFulfilled(requestId, data); 

flightStatus = data; 

} 


/** 

* Allow withdraw of Link tokens from the contract 

*/ 

function withdrawLink() public onlyOwner { 

LinkTokenInterface link = LinkTokenInterface(chainlinkTokenAddress()); 

require(link.transfer(msg.sender, link.balanceOf(address(this))), 'Unable to transfer'); 

} 

}  

Open this code in Gist    

The breakdown of each component of this contract is as follows –   

  1. Constructor: Sets up the contract with the Oracle address, Job ID, and LINK fee that oracle charges for the job  
  2. requestFlightStatus function: Builds and sends a request. The request includes fulfillment functions selector – to the oracle. Notice how it adds the get, path, and parameters. These are read by the tasks in the job to perform correctly. ‘get’ is used by HTTP, and ‘path’ is used by JSON Parse.
  3. fulfill function: This is where the result is sent upon the completion of Oracle’s Job.
  4. WithdrawLink Function: This method is used to withdraw the user’s link token from their smart contract.   

Note: The calling contract should own enough LINK to pay the fee, which by default is 0.1 LINK. 

Step 4: Deploy And Test   

  • Now choose Injected Web3 as your Environment in Remix and deploy your contract to the goerli TestNet.  
  • Next, choose the requestFlightStatus() function, it will then pay the transaction fee, and when the transaction becomes successful, it calls the flightStatus, and the result is displayed as shown below.

Deploy and Test 

Ending Words

Well, if you want to connect APIs from Ethereum smart contracts using chainlink oracles in your existing or new Blockchain-based projects, get in touch with one of the excellent Blockchain development companies (Infrablok). It will help you get a professional who can handle your project from scratch.